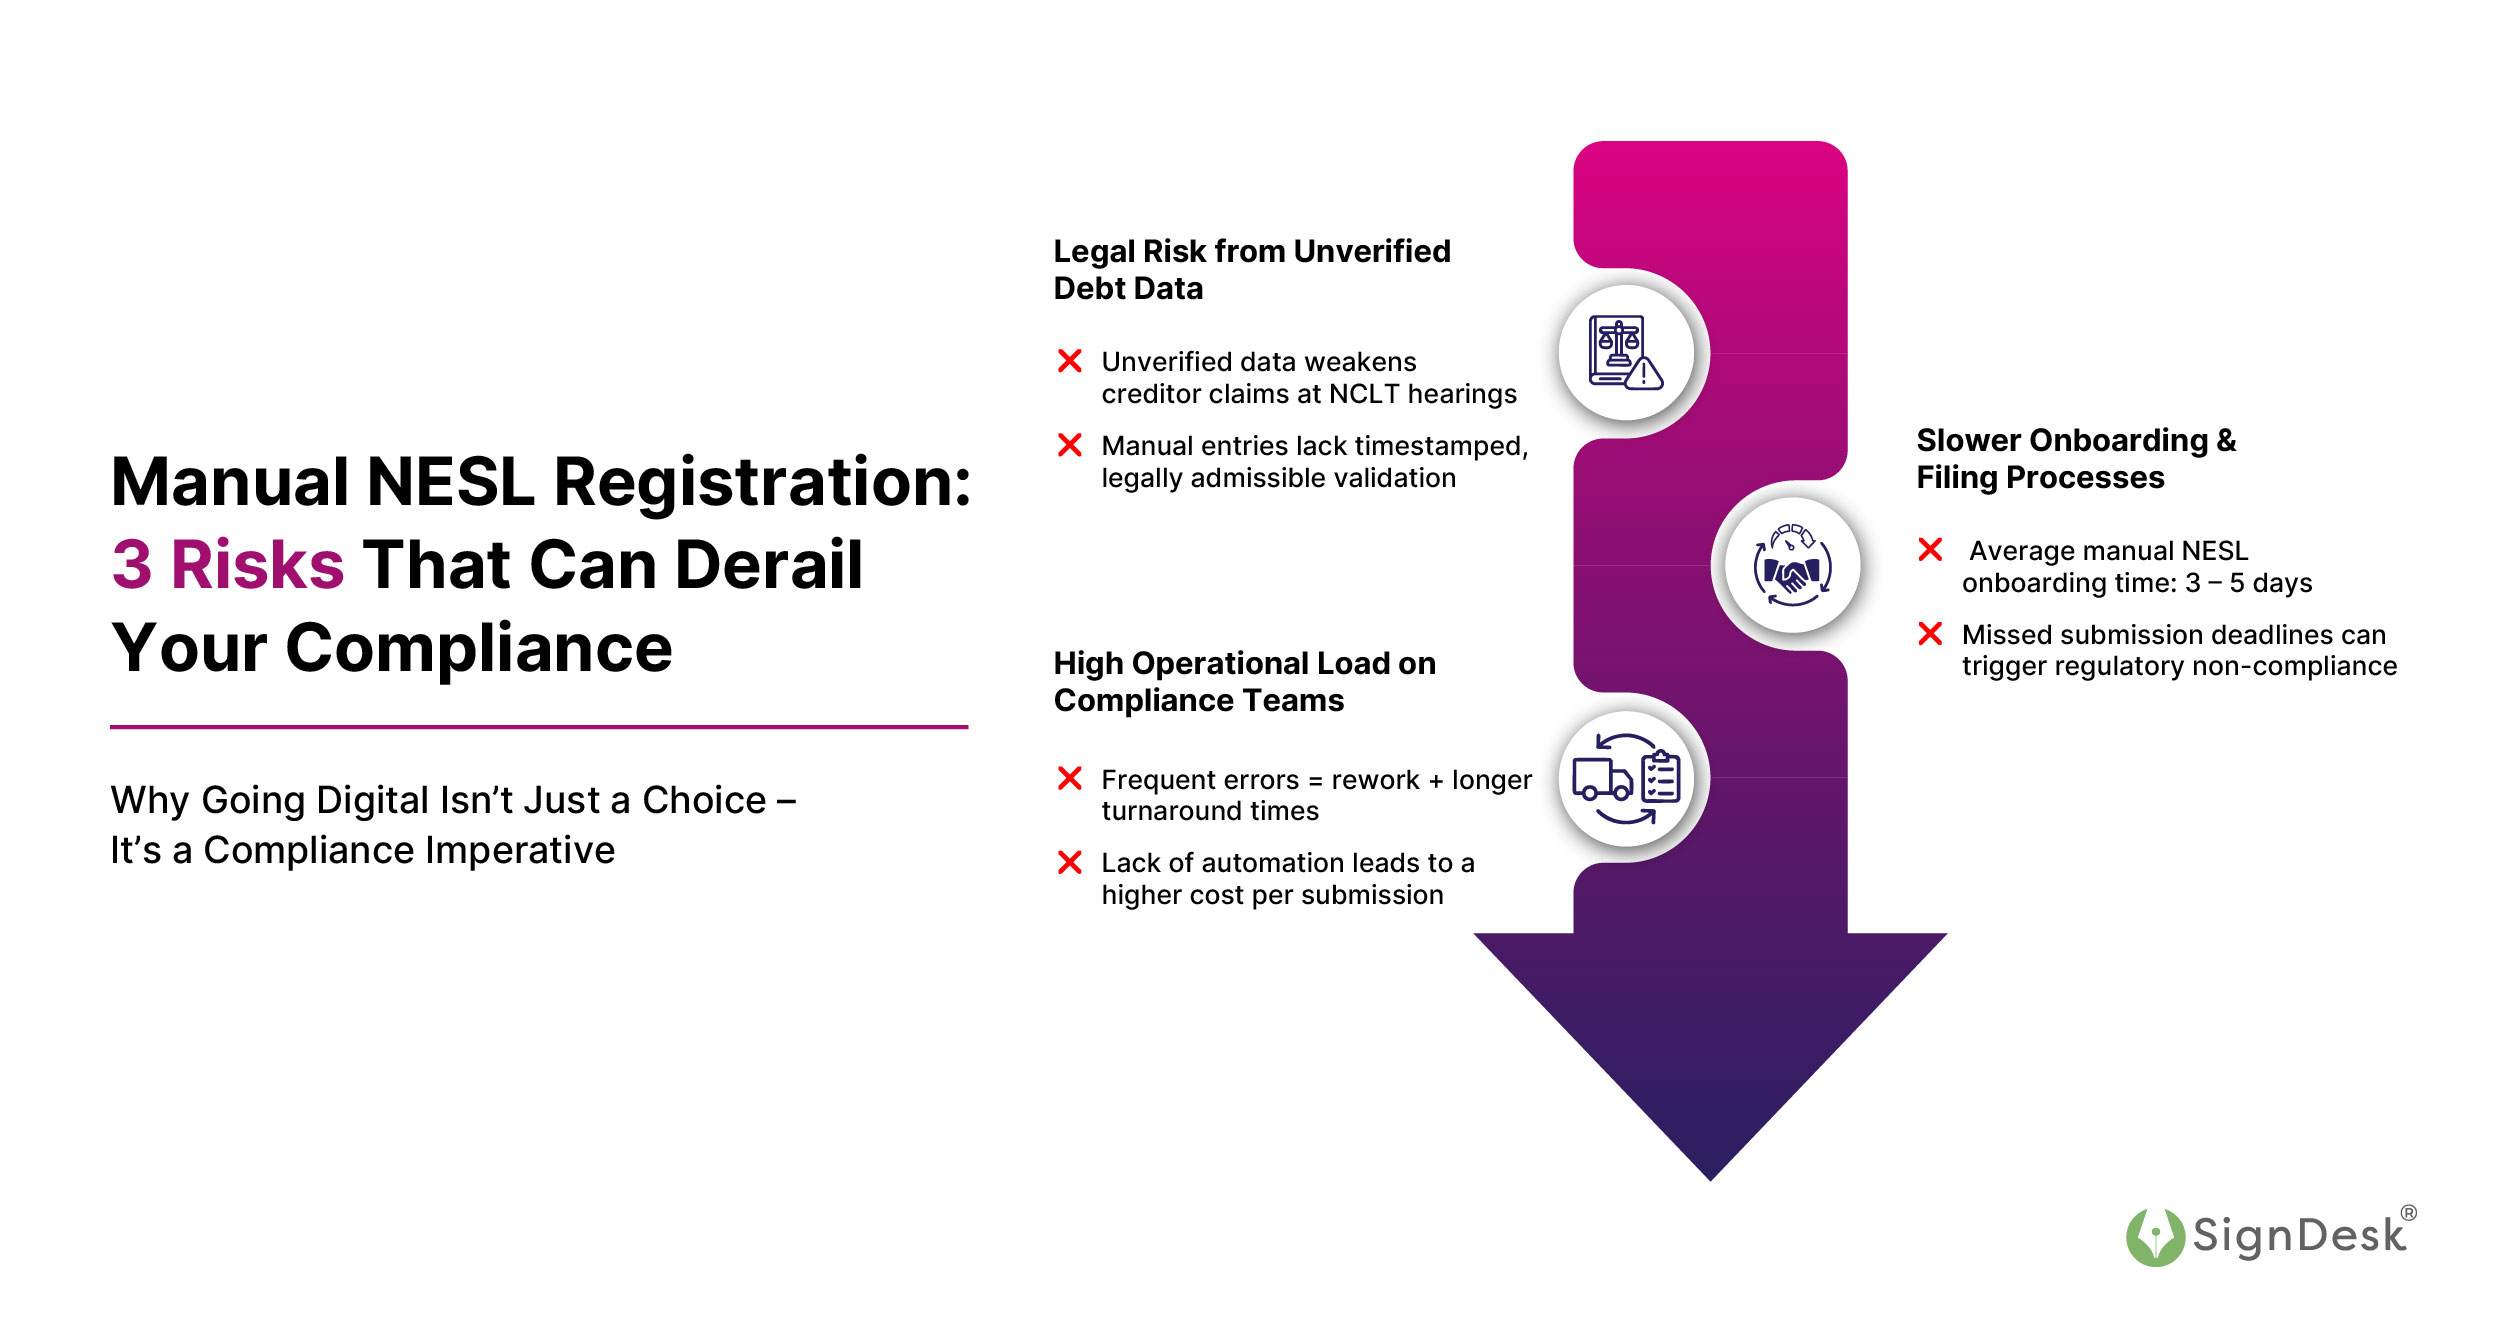
Missed NeSL registration deadlines can derail insolvency cases and trigger regulatory penalties. In a space where IBBI recorded over ₹184 trillion in debt filings, manual processes introduce delays, audit risk, and reputational damage. This pressurises BFSI enterprises to ensure timely and accurate digital debt reporting, making the NeSL registration process essential.
CXOs across BFSI now trust SignDesk to replace paperwork with legally valid digital execution. The result? Turnaround time falls by 68%. Accuracy improves by 88%. 100% airtight compliance.
From eKYC to eSign and NeSL-integrated eStamp, everything is executed on a single platform. Read on to explore how top lenders are transforming debit workflows with automation.
What is NeSL: Why is NeSL Registration Critical for BFSI Compliance and Court Admissibility?
NeSL (National E-Governance Services Ltd) is India’s first and only Information Utility under the Insolvency and Bankruptcy Code (IBC), 2016. It plays a critical role in digitizing and verifying debt information submitted by financial creditors. NeSL ensures that borrower-creditor data is real-time and legally admissible.
NeSL performs these functions by offering the following core services:
- Accept electronic submission of financial information
- Safely and accurately record financial information
- Authenticate and verify the financial information submitted
- Provide access to the stored information to specified persons or entities
What is the Regulatory Significance of NeSL for Lenders & Borrowers?
Lenders must complete financial debt information submission to NeSL regularly. This helps create a verified debt trail, enforceable under insolvency proceedings. Non-compliance can result in legal delays, penalties, or adverse court orders.
|
Why Lenders Rely on NeSL
|
- Ensures evidence of default is valid in the National Company Law Tribunal (NCLT)
- Reduces resolution timelines by up to 60%, per IBBI
- Supports early fraud detection and dispute prevention
|
Borrowers benefit from transparency and standardized recordkeeping. Discrepancies in repayment history or loan terms are reduced. All parties gain visibility and trust in the credit lifecycle.
How to Complete the NeSL Registration & Submission Process Fast – And Stay 100% Compliant
This section will detail the NeSL workflow – let’s dive in.
NeSL Registration
(Source: https://nesl.co.in/ )
For Financial Creditors (Lenders)
To initiate the NESL registration process, financial creditors must complete entity-level registration. They can register using the Aadhaar credentials of an authorized representative. Here’s a step-by-step breakdown:
|
#1: Keep the Following Documents Ready
|
- For Companies: An Authorization letter issued to an employee
- For Partnerships: Partnership deed + authorization letter
- Other Requirements:
- Aadhaar number of the authorized person (linked to mobile)
- Digital Signature Certificate (.cer file) – optional but recommended
|
|
#2: Begin Online Registration
|
- Visit: https://iu.nesl.co.in
- Choose “Entity Registration”
- Enter Aadhaar number, name (as on Aadhaar), and date of birth
- Click “Verify Aadhaar”, enter the OTP sent to the Aadhaar-linked mobile
- Agree to the eKYC terms and click “Validate”
|
|
#3: Enter Entity Details
|
- Select your entity category: Corporate or Non-corporate
- Choose sub-type (e.g., Company, LLP) and origin (Indian)
- Provide: PAN, CIN/LLPIN, GST Number, and registered address; State code, PIN code, official email, and phone number
- Click “Next” to proceed
|
|
#4: Add User & Authorization Details
|
- Fill in: Employee ID, designation, primary & alternate contact details
- Upload Authorization Letter and DSC (.cer file) (if available)
- Provide IU fee payment reference (e.g., NEFT UTR)
- Agree to Terms and Conditions
- Click the green “Register” button to submit
|
What Happens Next?
NESL verifies submitted information for accuracy and compliance.
Upon approval:
- The user ID is sent via email
- The temporary password is sent to the registered mobile number
- Login credentials must be used to access the NESL-IU portal
- Update the password on first login to complete registration
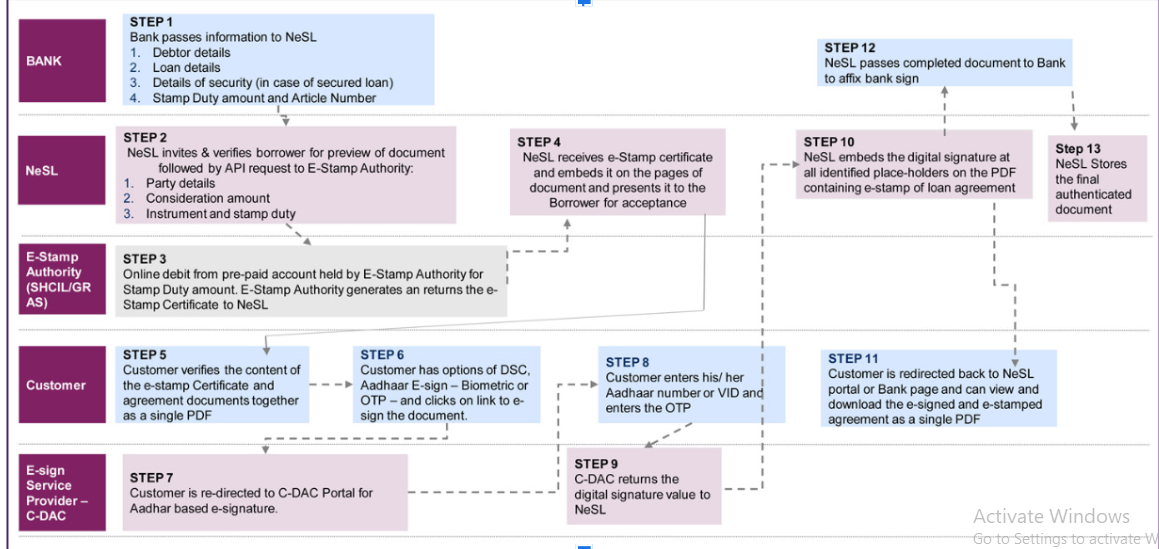
Once you are registered with NeSL, here’s how you can upload loan data.
|
#1: Register & Access the NESL Portal
|
- Operational creditors register as users on the NESL-IU portal
- Visit: https://iu.nesl.co.in/NESL_Portal/
- Log in to access the dashboard and click: Submission > New Submission
- The system opens Form C Version 3, featuring tabs like: Submitter Info, Other Party Details, and Debt Information
- Fill in all mandatory fields (marked with a red asterisk *)
|
|
#2: Initiate Loan Submission
|
- Choose New Loan under the New Submission tab
- Select the type of debt: Operational or Financial
- Enter the Business Date(defaults to today’s date; can be modified)
|
|
#3: Verify Submitter Details
|
- Submitter details auto-fill from the registration profile
- The system auto-selects “Creditor” as your contract role
- If not the creditor, choose the correct relation from the dropdown
|
|
#4: Input Debtor Information
|
- Accurately fill in the Debtor details in the designated fields
|
|
#5: Enter Debt & Loan Details
|
- Debt type auto-populates from earlier selection
- Add the Debt Reference Number (for Operational Debts)
- Choose the Debt Start Date (disbursement date) from the calendar
- Currency defaults to INR, or select other from the dropdown
Enter:
- Sanctioned Loan Amount
- Facility Name (type of finance)
- Outstanding & Overdue Amounts
Under “Account Closed Flag”, select:
- No – if the loan is active
- Yes/Assigned – if closed or transferred
|
|
#6: Add Security Details (If Any)
|
- If unsecured, select “Not Applicable“
If secured:
- Fill in all mandatory security-related fields
- Choose Type of Charge and Asset Type from the dropdowns
|
|
#7: eSign & Submit Form C
|
- The system displays the IU Fee and prompts eSigning
- Select preferred method: Aadhaar eSign (OTP-based) or Digital Signature Certificate (DSC)
For Aadhaar eSign:
- Enter Aadhaar number → Click “Get OTP”
- Enter the OTP received on your registered mobile
- Tick the consent checkbox and click Submit
On successful authentication, you’ll see confirmation: “eSign Successful – Form C Submitted”
|
|
#8: Pay the IU Fee & Save Submission
|
- Click “Pay Now” to proceed to the payment gateway
- Pay via Debit/Credit Card, Net Banking, UPI, or Wallets
- After successful payment, return to the NeSL dashboard
- Download & save the submitted Form C PDF for records
- The NeSL system sends a confirmation email to the submitter
|
✅ Pro Tip: For high-volume or recurring submissions, integrate this process with SignDesk for faster, compliant, and automated NeSL data handling.
✅ Solution: Switch to Smart, Automated NeSL Compliance Workflows with SignDesk.
Steps for Borrowers / Corporate Debtors to Authenticate on NeSL
|
#1: Get Ready for Authentication
|
- Ensure you have access to your Aadhaar-linked mobile number
- You’ll need it to receive the OTP for eSign authentication
|
|
#2: Log In to the NeSL-IU Portal
|
- Go to the portal: https://iu.nesl.co.in
- Select “Legal Entity User” as login type
- Enter your Legal Entity Name – PAN will auto-fill
- Input your User ID, Password, CAPTCHA, then click Login
|
|
#3: Locate the Loan Details for Authentication
|
- On the welcome screen, click the “Authentication” tab
- Find the relevant Loan Number and select it
- Click on the latest Submission Reference Number from your creditor
|
|
#4: Review and Authenticate Debt Details
|
- A screen titled “Form C – Debtor Authentication” will appear
- Review the loan information provided by your lender or bank
- If the data is accurate, click “Yes”, then choose Aadhaar eSign
To Authenticate:
- Your Aadhaar number and name will be displayed
- Click “Save & Authenticate” (green tab)
- You’ll be redirected to the eSign Service Provider page
|
|
#5: Record Disputes or Remarks (If Any)
|
- If you disagree with the loan details, click “No”
- A remarks box will appear – enter your dispute or observations
- Your input will be recorded and attached to the authentication
|
|
#6: Complete eSign & Download Proof
|
- On the eSign page, enter your Aadhaar number and click “Get OTP”
- Enter the OTP received on your registered number
- Check the consent box and click “Submit” to complete the eSign
- A message will confirm: “Authentication Successful”
- Download the PDF of the authenticated Form and save it securely
|
Referred to: https://nesl.co.in/authentication-process/
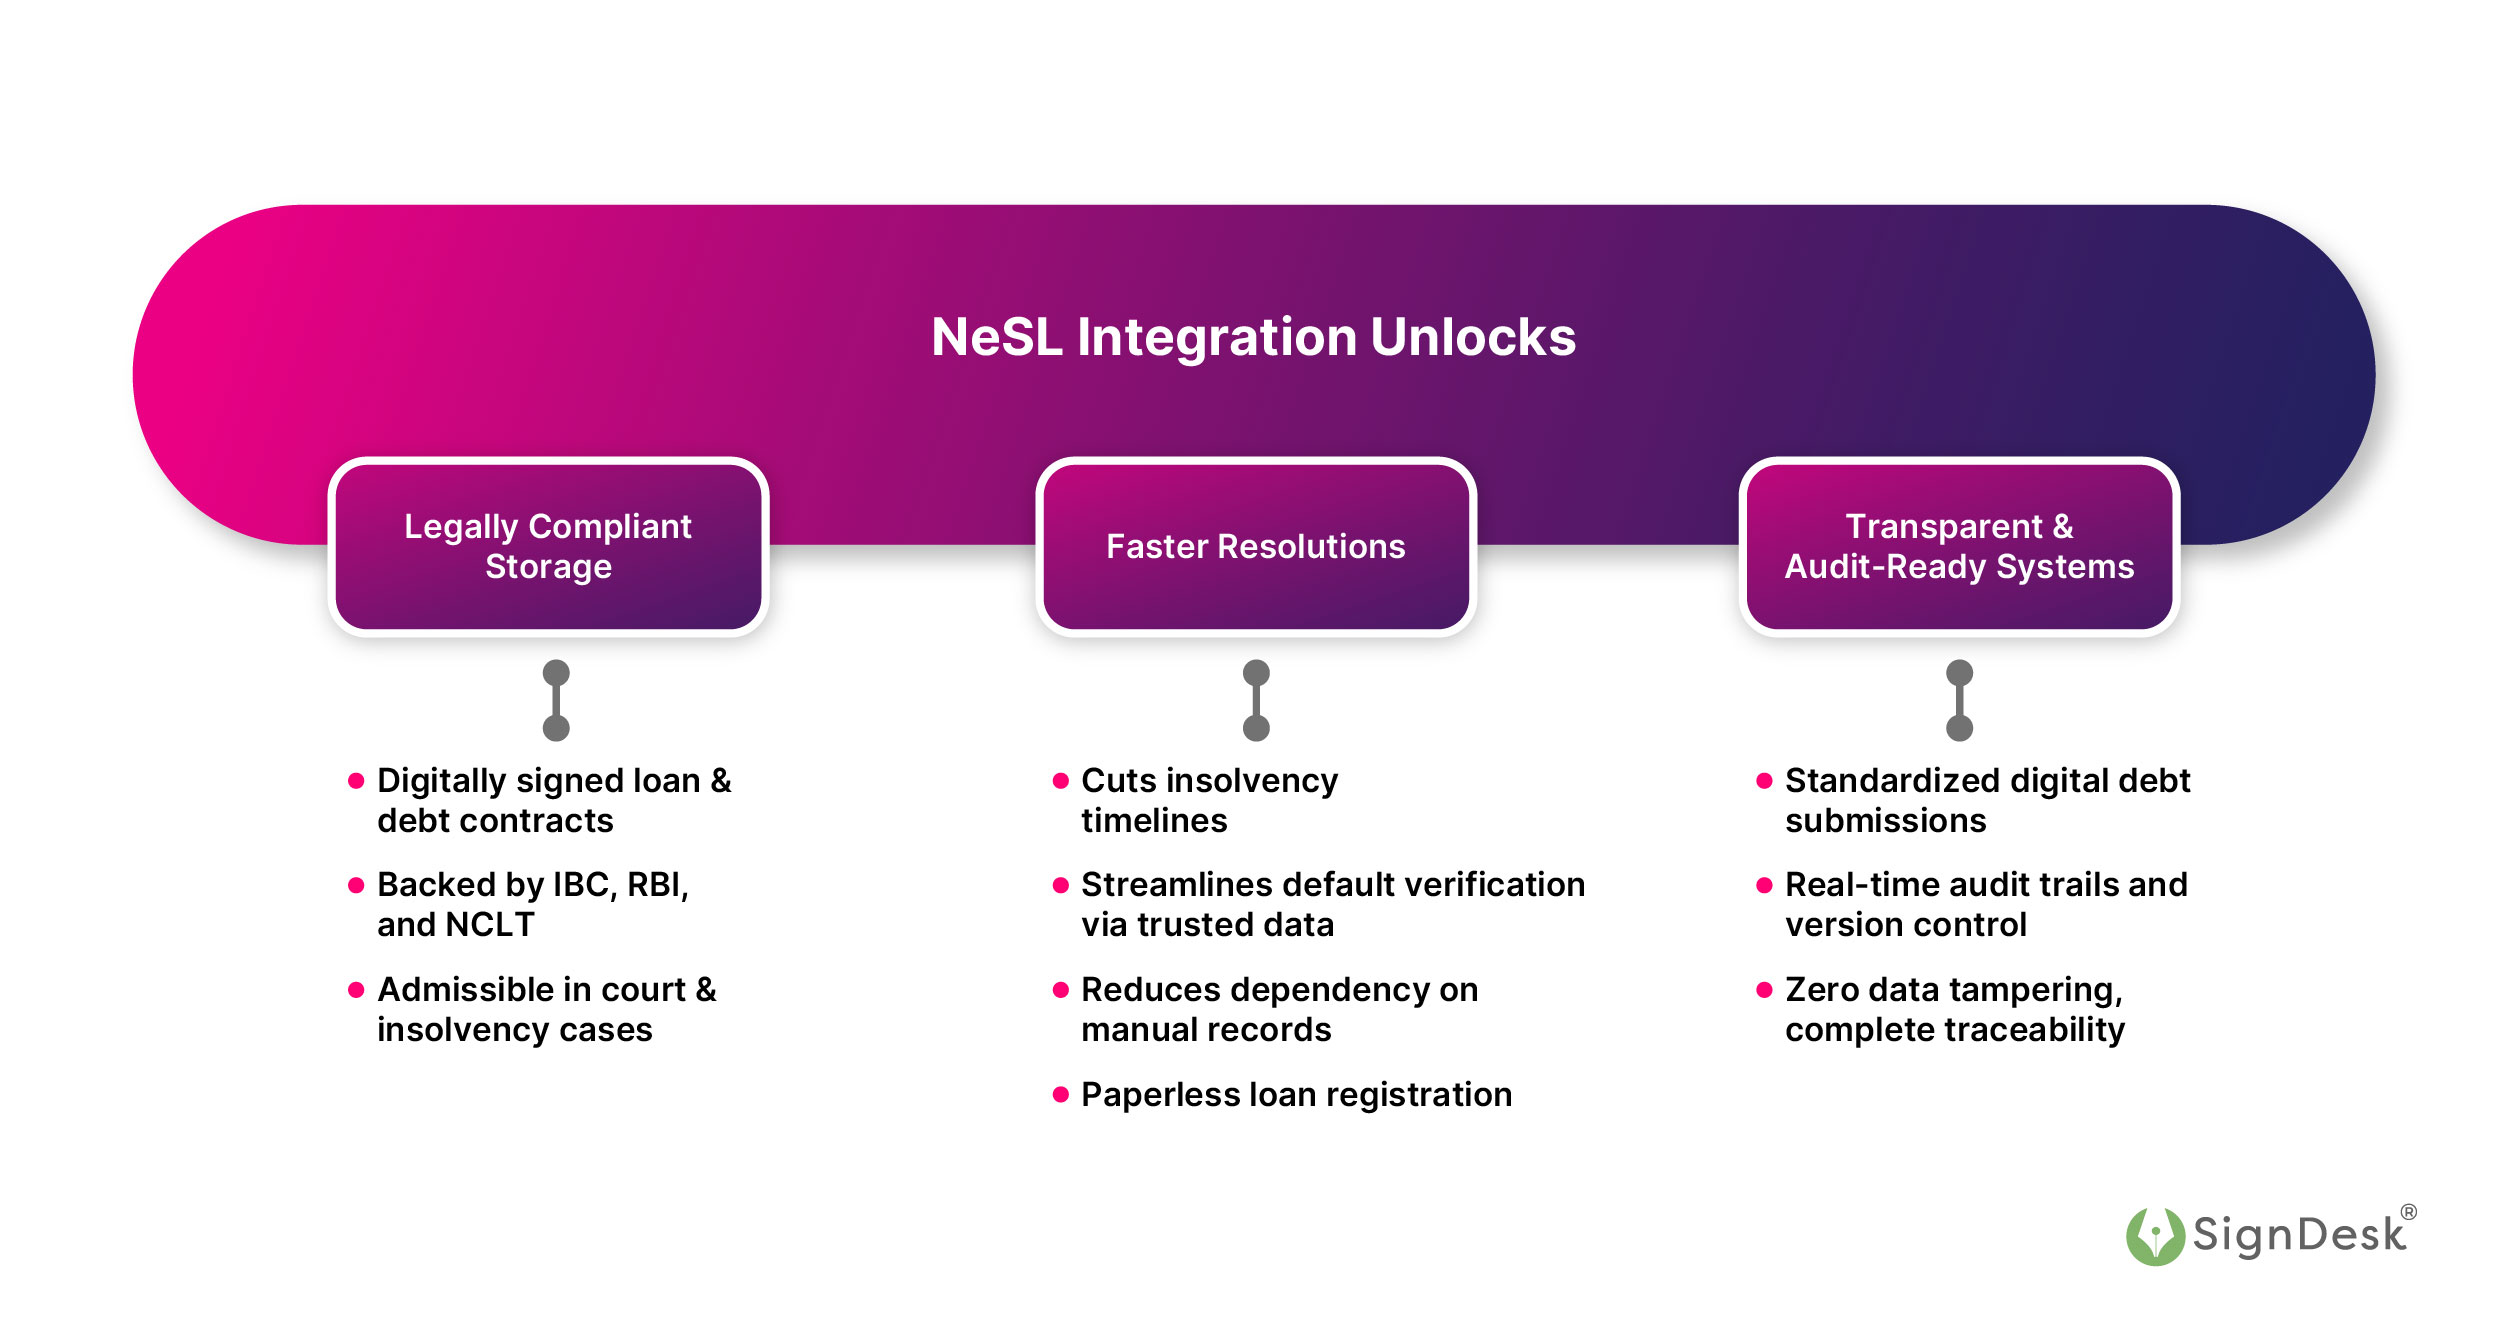
Why CXOs Choose SignDesk as Their NeSL eStamping Partner?
|
SignDesk X NeSL Integration – A Non-Negotiable for Enterprises
For CXOs, Compliance Heads & Digital Transformation Leaders,
NeSL = Beyond Compliance
Digitize processes → De-risk operations → Ensure regulatory preparedness. |
SignDesk enables 100% digital NeSL eStamp workflows, eliminating bottlenecks and reducing turnaround times by up to 68%.
- Instantly Meet RBI & IBC Regulation Compliance – Zero Audit Risk
– End-to-end digital journey: generate, stamp, sign – all in one flow
– Fully compliant with RBI, IBC, and NeSL IU regulations
– Avoid penalties and disputes with legally verifiable audit trails
- Smarter Stamp Duty, Better CXO Decisions
– Pay via a secure Master Wallet with consolidated reconciliation
– Bulk stamp contracts, trigger debt submissions, and track it all
– Seamless NeSL integration keeps your legal and ops teams aligned
- Save Over 50% in Operational Costs
– Eliminate stamp paper stockpiling, manual data entry, and courier dispatch
– Lenders using SignDesk report up to 54% cost savings
– Bulk upload & auto-stamping reduces back-office dependency
- 100% Digital, 100% Secure
– Govt-authorized eStamping across 25+ states & UTs
– AES 256 encryption with secure, tamper-proof digital records
– Every action is logged for instant audit-readiness
- eSign, Simplified for Every Stakeholder
– Aadhaar-based OTP eSign integrated with NeSL IU APIs
– One-click invite, automated reminders, and signer analytics
– Boost completion rates and reduce follow-ups with smart triggers
- Automation That Works for You
– Smart templates for faster uploads and reusable workflows
– Auto-calculate stamp duty and pre-order stamps before you run out
– Track every document status with real-time dashboard updates
| 🏅 Endorsed by NeSL Leadership |
|
“SignDesk is an established player in this segment, and this partnership would help us reach out to many users who would benefit from digital and paperless e-stamping, which is also legally enforceable in digital form.”
– Debajyoti Ray Chaudhuri, MD & CEO, NeSL
|
CXO Insights: How SignDesk eSign & eStamp Drive Real Business Results
Trusted by 3,000+ enterprises, SignDesk empowers large-scale BFSI and fintech to digitize and de-risk their most critical workflows.
Here’s how industry leaders are transforming with SignDesk eSign and eStamp:
|
Axis Securities – From Paper Delays to Seamless Digital Signing
|
|
Manual signatures were stalling documentation and impacting TAT. By adopting SignDesk eSign, Axis Securities eliminated paperwork, improved documentation flow, and drove team-wide digital adoption.
|
|
Result: Faster workflows, 68% lesser TAT, and seamless regulatory compliance.
|
|
Upstox – Scalable Digital Stamping for High-Volume Transactions
|
|
With higher monthly transactions, Upstox needed a partner that could match speed with scale. SignDesk’s bulk digital stamping enabled secure, high-speed stamping without slowing operations.
|
|
Result: 4,000+ monthly eStamps, zero compliance hiccups, and end-to-end workflow automation.
|
SignDesk is the choice of leaders who want speed, security, and scale – without compromise.